Buying black garlic is super expensive, four ounces sell for $7.95 online, and a single head costs about $2, it is even called the “Black Gold”. You can save a lot of money and make this black gold at home. All you need is a black garlic fermenter and patience. The process of making black garlic requires regulated temperature and humidity. To get these conditions you can use a “black garlic fermenter”.
What is black garlic?
Black garlic, the “Black Gold” is regular garlic that is aged and fermented. In other words, black garlic is the product of aging regular garlic for a long time. This process can take from weeks to months. Over time the garlic starts browning and eventually it becomes black.
What actually happens to the garlic when it is kept for weeks at low temperatures in a humid environment, is that the enzymes that give fresh garlic its sharpness break down. It is funny, but these conditions are the same conditions that make a steak, grilled meat, taste so tasty, it is the Maillard reaction.
In black garlic, the flavor is surprising. You expect to get a strong garlic flavor, but instead, the hard-garlicky flavor is softened, and it almost or entirely disappears. The strength of the flavor depends on the length of time it is heated.
The sugar content of the garlic you use will determine how your end black garlic will be. Higher sugar content garlic will produce a milder, more caramel-like flavor. And a clove of garlic with a low sugar content produces a sharper, somewhat more acidic flavor.
The easiest way and the way that I like making black garlic is with a black garlic fermenter. Some people call it different names, such as garlic maker, black garlic maker machine, black garlic fermenting box, they are all the same thing.
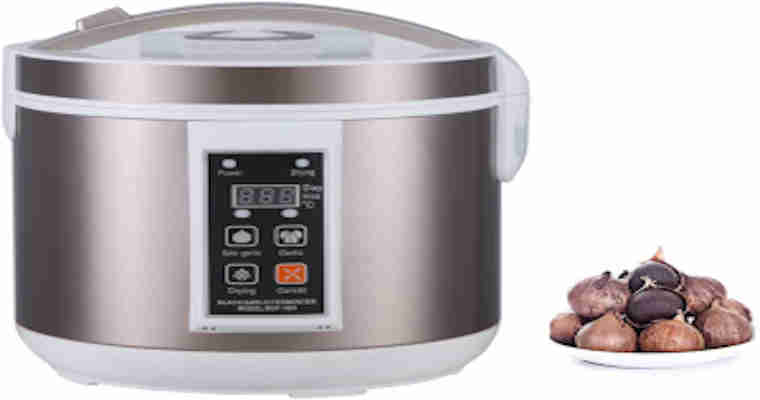
Homend 5L Black Garlic Fermenter
This black garlic fermenting box makes the process so easy. This small black garlic fermenter that looks like a rice cooker, is made specifically for making black garlic at home quickly and easily. It has a one-touch program that sets the black garlic fermenter to a temperature of 70-80f and an automatic fermentation count system. The result provided by this fermenter is soft, sweet, and sour black garlic.
There is a freely layered tray that can be adjusted according to the height of the garlic, so that black garlic can be evenly heated and avoid extrusion to cause bad fermentation.
Features:
- Available in Gold and Rose Gold
- Takes 12 days for multi cloves and 15 days for solo garlic
- Capacity: 5L (about 2 pounds of black garlic each time)
- Voltage: AC 120V 60Hz
- Power: 90W
- Weight: 7.68 pounds
If you want a little bigger black garlic fermenter machine you can try the
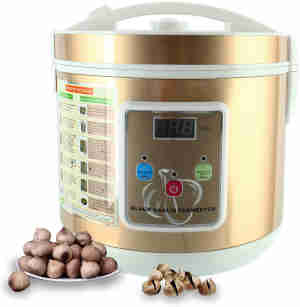
INTBUYING 6L Black Garlic Fermenter

This black garlic fermenter uses a unique smart solo system. You can choose the fermentation function, and the fermentation time: 9-13 days (216-312 hours) It can be adjusted to meet different taste effects, different time needs of choice.
Features:
Voltage: 110V
Capacity: 6L
Gross Weight: 3.85kg / 8.69 pounds
Fermentation Time: 9-13 Days (216-312 Hours)
Heating Method: Three-dimensional Heating
How to use black garlic in recipes
There are many ways that black garlic can be used, here are some ideas. If you have any of your ideas I will be happy if you write them in the comments and I will love to try them.
- Purée with oil, then smear the paste on crostini.
- Mix cloves with cream cheese and some fresh herbs for a dip.
- An addition to a cheese plate
- Mix some cloves with mayo and, it will grate with chips.
- Slice thinly and use to top salads.
- Add some cloves to Bolognese or any tomato-based souse enhance flavors.
- Mix cloves with a good quality olive oil for a salad dressing.
- Bon appetit website recommends drying the black garlic in a dehydrator. Powder it, and sprinkle it on anything that wants some earthiness and depth.
Making black garlic at home
Equipment:
• Black garlic fermenter
Ingredients:
• Fresh Garlic
• A lot of Patience
Instructions:
- Wrap each garlic head in parchment paper and a second layer of aluminum foil.
- Place the garlic heads into the fermenter.
- After two weeks start checking the garlic. Check its color and texture. You should keep the garlic in the fermenter until the cloves are dark brown to black.
- Once finished, peel the cloves, and store them in a sealed container.
Note:
- When opening the lid as steam escaping will be extremely hot.
- For best results with fermentation, always keep the lid closed during the entire fermentation process.
- The 4 Best Fermentation crocks
- The 4 Best Fermenting Kits- September 2020
- 6 Tips for Successful Fermentation
- Best fermenting jars
This site is a participant in the Amazon Services LLC Associates Program and contains affiliate links to products. We may receive a commission for purchases made through these links.